Welcome to Mondince Bike - A well-known factory specialized in produce carbon bike frame and other parts since 2007.
what size push bike do i need
Shopping for a new push bike can feel like you need a secret decoder ring. You see sizes listed as 12-inch, 14-inch, or recommended for ages “2-4,” but what does that actually mean for your child? It’s a common frustration for parents trying to find a safe and fun first ride. For clarity, we'll use the terms "push bike" and "balance bike" interchangeably, as they both refer to the same pedal-less bikes perfect for beginners.
While those age ranges and wheel sizes seem helpful, they often miss what really matters. A child’s leg length—not their age or even their height—is what truly determines their comfort and control on a bike without pedals. A bike chosen based on age might be a perfect match for one child but a wobbly, tip-toe struggle for another of the exact same age. This one measurement cuts through all the confusion.
Forget the guesswork. This guide will show you how to find that single, all-important number in under 60 seconds using items you already have at home. With that measurement, finding the right fit for a balance bike becomes simple, giving you the confidence that you're choosing a bike that will feel safe, build skills, and be fun from the very first push.
The Golden Rule of Bike Sizing: Why Inseam Beats Height and Age
If you've ever shopped for kids' clothes, you know that "age" is just a suggestion. A "4T" shirt might fit one three-year-old perfectly and be too small for another. The same problem happens when choosing a balance bike; age and even total height can be surprisingly misleading guides.
Instead of relying on these vague estimates, the single most important number for sizing a balance bike is your child’s inseam. This is the distance from the floor up to their crotch, just like the inside leg measurement on a pair of pants. This figure is the secret to a perfect fit because it tells you your child’s actual leg length, not just how tall they are overall.
Why does this one number matter so much? A balance bike only works if your child can sit on the seat and still place their feet flat on the ground. This provides the stability and confidence they need to start gliding. Two toddlers can be the exact same height, but if one has shorter legs, a bike chosen based on height alone will be too tall, leaving their feet dangling and making the bike feel wobbly and unsafe.
Getting this crucial measurement is easier than it sounds. You don't need any special equipment, and it takes less than a minute.
How to Measure Your Child’s Inseam in 60 Seconds (No Special Tools Needed)
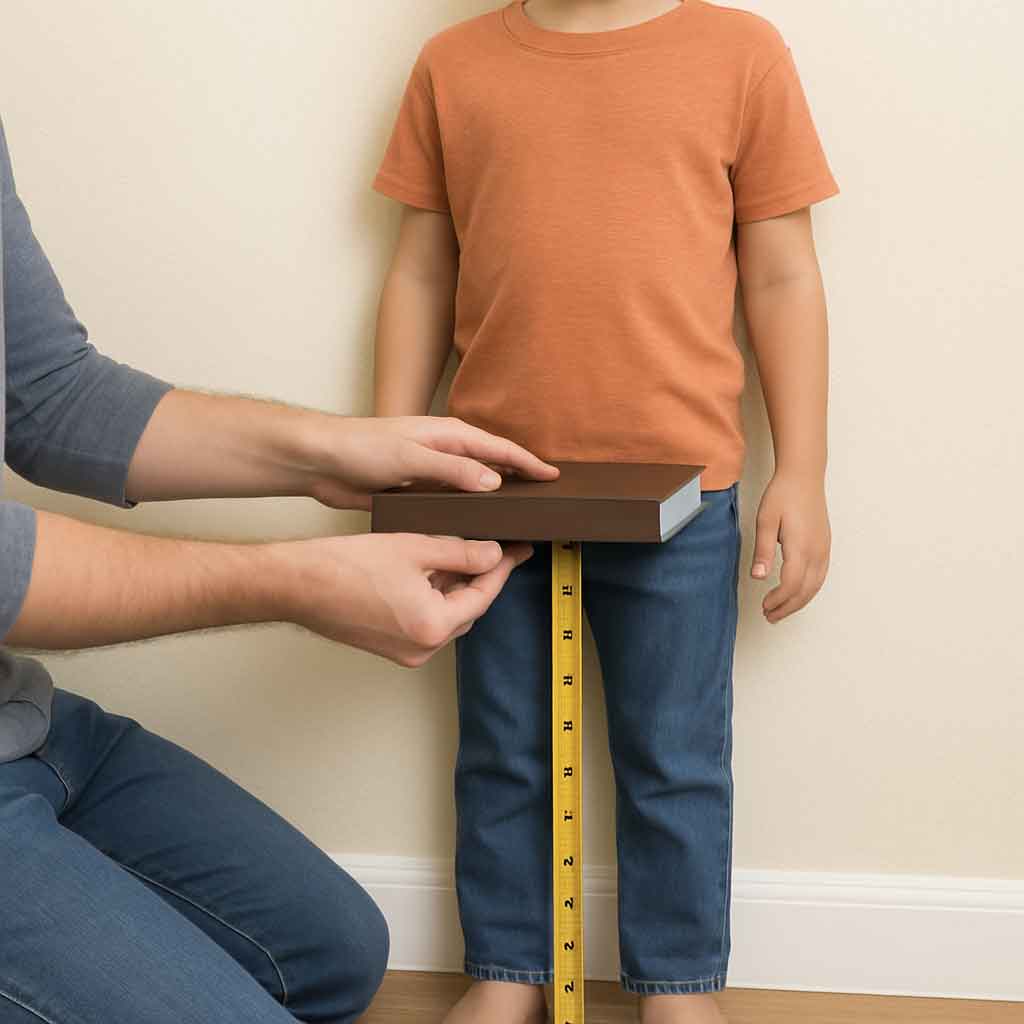
Getting an accurate inseam measurement for a toddler can sound like a challenge, but this method is quick, easy, and wriggle-proof. You don't need a tailor's tape or any special equipment—just a hardcover book, a tape measure (or even a ruler), and a wall. This simple process will give you the exact number you need to ensure a perfect fit.
For the most accurate result, have your child keep their shoes on, since they’ll be wearing them when they ride.
- Stand Tall: Have your child stand with their back straight against a wall.
- Position the Book: Place a thin hardcover book between their legs, with the spine facing up. Gently slide the book upward until it's snug against their crotch, mimicking where a bike seat would be.
- Hold and Step Away: Ask your child to step away from the wall while you hold the book firmly in place.
- Measure: Grab your tape measure and measure the distance from the top of the book’s spine down to the floor.
That’s it! The number you just measured is your child’s inseam. This single measurement is far more reliable than age or height and is the golden ticket to finding a balance bike that’s not too tall or too short.
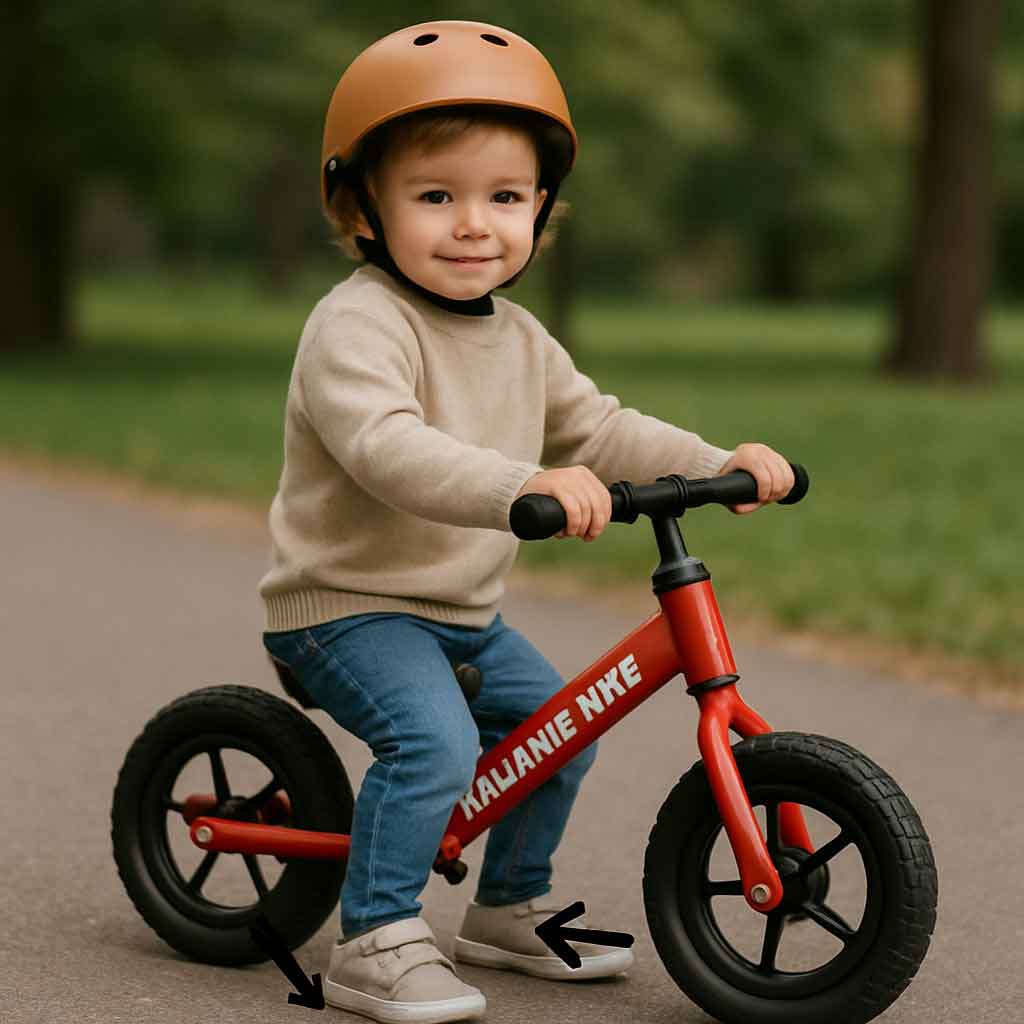
What a Perfect Fit Looks Like: The “Flat Feet” and “Bent Knees” Test
With your child's inseam measurement, you can now set the correct balance bike seat height. For a new rider, confidence is everything, and it starts with their feet planted firmly on the ground. When your child sits on the bike, they should be able to place both feet completely flat on the floor, not just on their tiptoes. This isn't just about comfort; it's the master key to safety. Flat feet give them the stability and control they need to stop instantly, preventing wobbly starts and nervous tumbles.
While flat feet are crucial for stopping, a slight bend in the knees is what makes them go. Imagine trying to run with perfectly straight, locked-out legs—it wouldn’t work very well. The same principle applies here. With their feet flat, look for a comfortable, athletic-looking bend in your child’s knees. This slight flex gives them the power to push off the ground and build momentum. A bike that’s too short will cause an exaggerated, cramped knee bend, while one that’s too tall will leave their legs straight and ineffective.
Getting this combination right—flat feet for stability and bent knees for power—is the secret to how a balance bike should fit. It transforms the bike from a wobbly, intimidating object into a fun, confidence-building tool. When you are shopping, the goal is to find a bike with a minimum seat height that is at or just below your child's inseam. This ensures they can achieve this perfect fit from day one.
From Measurement to Model: Matching Inseam to Bike Size
With your child's inseam measurement in hand, you’re ready to crack the code of kids' bike sizing. Unlike adult bikes which are sized by their frame, kids' bikes are sized by their wheels. When you see a "12-inch" or "14-inch" bike, that number refers to the diameter of the wheels. A larger wheel means a taller bike overall. Your goal is to match your child’s inseam to the smallest wheel size they can comfortably ride, ensuring their feet can stay flat on the ground.
To make this simple, here is a straightforward balance bike sizing chart. Find your child’s inseam on the left to see the corresponding wheel size you should look for on the right.
- Inseam 12" – 15": Shop for a 12-inch balance bike.
- Inseam 15" – 18": Shop for a 14-inch balance bike.
- Inseam 18" and up: Shop for a 16-inch balance bike.
For example, say your 3-year-old has a 14-inch inseam. According to the chart, this puts them squarely in the range for a 12-inch bike. You now know exactly where to start your search. Remember, the bike's own seat height range is still important—you need a model whose minimum seat height is at or below that 14-inch inseam. This simple cross-reference ensures a perfect fit from day one. But what happens if your child's measurement falls right on the line between two sizes?
12-Inch vs. 14-Inch Balance Bike: When Is It Time to Size Up?
Deciding between a 12-inch vs 14-inch balance bike often comes down to your child’s starting inseam and age. A 12-inch model is the classic starter bike, perfect for most 2- and 3-year-olds with inseams between 12 and 15 inches. However, a 14-inch bike might be the best balance bike for a tall toddler or a child starting a bit later, around age 3 or 4. If their inseam is already 15 inches or more, starting them on a 14-inch bike gives them more room to grow and avoids an immediate upgrade.
The most reliable sign that your child has outgrown their current bike isn't their age, but the bend in their knees. As you raise the seat post over time, you’ll eventually reach its maximum height. If your child is riding with the seat maxed out and their knees are still bent high up towards the handlebars while striding, their movements have become cramped and inefficient. That’s the clear signal it’s time to move up to the next size for more comfortable and powerful glides.
While it’s tempting to buy a bigger bike for them to "grow into," this often backfires. A bike that’s too large is heavier and more difficult for a small child to handle, which can erode their confidence. If they can’t comfortably place their feet flat on the ground when seated, they won't feel safe or in control, making learning frustrating instead of fun.
"Oops, It's a Little Too Big!" – 3 Simple Fixes
Realizing the new bike is just a touch too tall can be frustrating, but don't rush to return it. If your child can stand over the top bar but can’t yet sit with their feet flat, you’re in a temporary transition phase, not a crisis. Before you do anything else, make sure the seat is lowered as far as it can possibly go. If it's still too high, here are three simple tricks to bridge the gap and get them comfortable while they grow that last little bit.
- The "No Seat" Method: For a week or two, remove the seat and seat post entirely. This lets your child walk over the bike's frame, getting a feel for its weight and how to steer. It completely removes the pressure of sitting and helps them master the bike's standover height with confidence.
- Check for a Lower Seat Post: Some brands sell shorter seat posts as an accessory. It's a small, inexpensive part that can make a huge difference, often lowering the minimum seat height by a crucial inch or two.
- Supervised "Tip-Toe" Practice: If they can just touch the ground on their tiptoes, allow for short, supervised practice sessions on a soft surface like grass. This limited exposure helps build their confidence until their feet can plant firmly.
Does Handlebar Height Matter? The Key to a Longer-Lasting Bike
While seat height is the number one priority for safety, the handlebars are all about fine-tuning comfort. Many parents look specifically for a push bike with adjustable handlebars because this single feature can extend the bike's usable life, allowing it to grow right alongside your child. It’s the difference between a bike that fits for six months and one that fits for two years.
For the best fit, you’re aiming for a natural, relaxed posture. Your child should be sitting mostly upright with a slight bend in their elbows, able to steer easily without reaching up or hunching down. If they look strained or cramped, a quick handlebar adjustment can make all the difference in their control and confidence.
A great starting point is to set the handlebars around the same height as the seat. From there, watch your child ride and ask what feels best. This simple tweak is the secret to turning a good fit into a perfect one that keeps them comfortable and happy on their bike for as long as possible.
Ready to Roll: Your 2-Step Plan for the Perfect Push Bike
You're now ready to move past the confusing numbers and confidently choose the right bike for your child. This simple, clear process ensures your little one gets started on a bike that feels like it was made just for them.
Finding the right fit for a balance bike all comes down to these two steps:
- Measure Your Child's Inseam: This is their true "bike size" number.
- Match It to the Seat Height: Choose a bike where the lowest seat setting is at or below that inseam measurement.
This simple check guarantees their feet can rest flat on the ground—the golden rule for building confidence and staying safe. With this knowledge, you’re not just answering "what size push bike do I need?"; you’re setting the stage for that magical moment when they lift their feet and glide for the very first time.